Showing posts with label hierarchy. Show all posts

Oct 2, 2018

PROJECT 04 - Exercise producing a complete value grayscale - Mounted on White presentation board


From these 96 total swatches, which are 2 carefully measured gridded sheets, 1'x1' squares, you will create a value scale representing TEN EVEN steps from black  to white. black and white with eight even incremental changes in-between.

Mount your swatches on presentation board for critique. Result is 1"x1" squares mounted on a 2"x11" white board.

Demonstration video


Materials
-Mars Black and Titanium White acrylic
-9x12 inch bristol board x 2
-Pallet knife
-1" Brush (bright)
-2 cups (for water)
-Paint palette (aluminum foil)
-Paper Towels
Process/Schedule


First Class Period
  1. Lay out grid (to create your swatches) on bristol board. 2 sheets total if you succeed to create a wide range of well painted solid values. You will need a 3rd page.
  2. Grid will have a total of 24 rectangular swatches per page, each measuring 1"x2" with 1/2" space in-between each rectangle. 3 swatches across top of 9"x12" page and 8 swatches down the length of page. Total swatches per page = 24
  3. Lay separatley black and white paints out on palette, and mix paints starting from black (or white) and adding incremental amounts of the opposite color. Mix paint throughly with palette knife and then brush until well mixed and you have a solid tone and brush-in swatches to fill the entire page. Must paint with smooth strokes, no streaks and an opaque thick coat of paint for full coverage. may have to use a couple of coats of paint to achieve a smooth clean opaque gray tone.
  4. Each swatch should have consistent color, and be a unique value. Must paint 3-4 of same values. The more variety of values you paint e, the easier it will be to select 11 strong swatches to create the final value scale.
  5. The goal is to create as many distinct values as you can. Fill in each rectangle of your grid with a solid value. Paint slightly beyond the borders. you must still be able to see original guides as you will be carefully cutting out each swatch one by one with an exact blade.
  6. Be sure you have all 10 values represented from from black (straight from the tube) progressing to middle gray, and continuing through light grays toward bright white (also straight from the tube). 
  7. Clean your workspace and all your painting materials (brushes, palettes, etc)

Second Class Period
  1. Finish painting your two pages of value swatches. You may need more than 2 pages.
  2. Lay out your presentation board, using the guidelines provided below.
  3. With a metal ruler, and cutting board, carefully cut-out your painted swatches so they are exactly the same size (1" x 1"). Cut very carefully following the guides you measured out. Makes life easier and cuts will be much more exact. Make sure cuts are clean, by using a new x-acto blade. NO CUTTING DIRECTLY ON TABLES. Cutting boards must be used. These have to be as close to perfect as possible.

Homework

  1. Finish laying out your black presentation board, using the guidelines provided. 
  2. Bring your presentation board to class, along with your x-acto knife. 
  3. Finish cutting out your swatches, if not finished in class.
  4. You may first glue your swatches on a strip of 1"x11" as a safety net to make sure all swatches are glued right next to each other and follow a straight pattern vertically.

Final Class Period
  1. Select the best swatches from your entire page that represent 11 consistent steps in value. 
  2. Show your presentation board (with layout lines/grid) to instructor. Once it has been given the ok, proceed with mounting of swatches. DO NOT PROCEED UNTIL YOUR LAYOUT HAS BEEN APPROVED.
  3. Using rubber cement, glue stick or regular glue, carefully glue swatches to presentation board. There should be no gaps between swatches, and all swatches should be perfectly aligned. 
  4. Let rubber cement dry slightly, and remove any excess glue with the appropriate eraser. 
  5. Neatly Label (name and date) your work with hard pencil in lower right-hand corner. 
  6. Cut and tape tissue paper sheet to act as protector. 
The final 30 mins of class will be reserved for critique.

Rubric


You will be evaluated on the following:

1. Laying out your bristol board into an even grid (even measurements, straight lines).
2. Your ability to mix the paints evenly. 
3.  Painting swatches that are free of brush strokes, or excessive paint build up.
4.  Filling up your entire page with different/distinct values.
5. Choosing the best 10 swatches that represent even steps from black to white. 
6. Laying out your presentation board neatly (consistent measurements, and centered)
7. Cutting out your swatches, and mounting them to the presentation board. 
8. Removing excess glue and having all your swatches line up evenly. 

Layout Measurements

Below is the sample of the GRID for the Value scales. you need to be sure and cut the 1"x10" support strip to glue your swatches and also mount them on the 2"x11" thicker mounting board with a 1/2" boarder all around as we had done in class. if you have questions please ask me or communicate with your class mates for information.


May 9, 2018

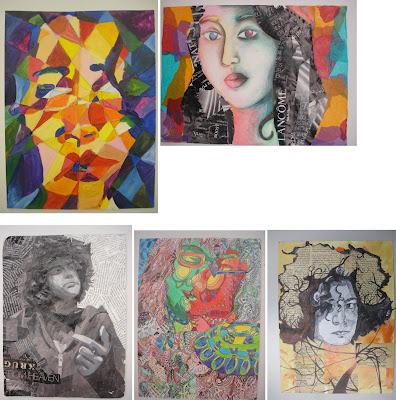
MIXED MEDIA ASSEMBLAGE/COLLAGE PROJECT – DUE DATE- 5/15 + 5/16, 2018

Purpose
Create two mixed-media portraits or still life on Bristol board or other surface. Think about the theme of your persona or your subject's persona and style on how you will approach the project. This is not about traditional portraiture or just creating a typical still life, it's an interpretation as well, it's your original, unique vision, but it gives you the freedom to find creative solutions to challenge traditional perceptions. Think abstract, deconstruction, mixed media, collaging, material, overlapping, LAYERING and weaving in your elements in creating a strong compositional solution. use your creative mind and create an affective integrated, cohesive series of TWO works of art that challenge the norm. Intergrate! don't treat your materials as seperates. they all must work together. INTEGRATION, NOT SEPARATION.

Two interpretive pieces either alternative portraiture or still life. Through the process, you will begin to explore additive technique in two-dimensional art. In particular, you will experiment with integrating collaging with traditional painting and drawing techniques. MUST BE VISUALLY PLEASING (good aesthetics please). Think and analyze your process, method of execution and explore creative solutions. Be experimental.

Attention will be given to the design principles we covered first semester. Namely: (framing, Scale, Hierarchy (points of interest/focal areas/emphasis), asymmetry, cropping techniques,  Textural look or feel, F/G relationship, balance, composition, value, contrast and color theory/relationships), color palette, asymmetry. All that we have studied thus far is crucial in creating a cohesive unified solution. How will everything tie in together to create a balanced composition. 

This project is treated as an abstraction and interpretive. not to be literal. All elements must work together to create a cohesive (unified), resolved, and finished work. Really think about your approach as in theme, style, be selective with materials and how to work them into your composition. Integrate the materials thinking of overlapping, layering, creating transparency in your finished piece. That can be done with different methods of layering mediums. You really need to analyze your piece and be visually aware of your AESTHETICS.

Due Dates (Critiques)
Mon/Wed Class: Wednesday, May 16th. 
Tues/Thurs Class: Tuesday, May 15th. 

Rubric
You will be assessed on your application of the design principles mentioned above, your creative solution, integration of materials, craftsmanship, composition, execution, sketches, and your creativity. 
Note: All projects turned in after the due-date will be reduced by one letter grade. 

Materials

  • Two Sheets of Bristol board or  other surfaces 9" x 12" 
  • Paint, markers, colored pencils, charcoal, watercolors, etc.
  • Fabric scraps, tissue paper, magazine cutouts, string, yarn, newspaper, etc.
  • Appropriate adhesive (white glue, rubber cement, gel medium, sewing kit)

Process

Step 1
In your sketchbook, create 3 different contours (silhouettes) or whatever subject matter you choose that you will use as a reference for your collage. Themes can be a deconstructed portraiture, figurative, still life, abstract environment. BUT ALL ELEMENTS OF MEDIUMS AND MATERIALS MUST BE INTEGRATEAD, WEAVED INTO EACHOTHER, OVERLAPPING, INTERSECTING. MAKE IT A UNIFIED COMPOSITION. NOT COMPARMENTALISED. ELEMENTS MUST BE INTERGRATED NOT SEPERATED. MUST ALL WORK AS A WHOLE! THE SOME OF ALL PARTS. TOGETHER. FLOW, UNITY, COHESIVE. MUST WORK AS A PAIR.

PLEASE STUDY THE LINKS AND ARTIST LISTED. GIVES YOU IDEAS AND RESEARCH MATERIALS. POINTS OF REFERENCE. PLEASE!!!!

Begin by mapping out a theme/concept, think about materials, color palette, MAIN MATERIALS, your layout for both pieces, their relationships. what will crossover be? what is the common ground of your visuals, etc... Pay close attention to details, such as facial features or objects for still life. framing is important! and their relative size and position to one another. Be sure to map all these elements out correctly. Use cropping, scale and position on paper to create a dynamic composition.

Draw a silhouette of the head, then include neck and shoulders, add hair, include ears... Think about what you could add/remove to make it unique (pencil behind ear, sunglasses in hair, specific earring, etc). of course this also applies to a still life and all of its accents. whats the environment? look at Braque and Picasso JOSEPH CORNELL ASSEMBLAGES/collages. 

Process to consider when creating your mixed media composition. Think abstract. Think creative. deconstruct. think of creating focal areas and how your eye travels through the piece. WHAT ARE THE FOCAL AREAS? MAIN SUBJECT, SECONDARY TERTIARY FOCAL AREAS. Must have emphasis. things can't have equal importance on your canvas. there will always be a main subject. can't have everything same size, same value, same anyting. have to keep it DYNAMIC!

Step 2
Focus on other areas of your body as an option- hands, feet, legs, and entire figure. Repeat the steps above, to create 5 more contours from these observational drawings. 

Step 3
Tape the composition to a wall, take a step back, and examine all contours area of composition and theme. Examine the positive/negative space, and composition, of each contour. What is successful. SQUINT.

Now, look at the compositions alongside each other. Pay attention to the different ways the compositions interact with each other. How do they inform (relate and influence) each other? What combinations of compositions are particularly successful? WHAT IS THE FOCAL AREAS? MAIN SUBJECT, SECONDARY TERTIARY FOCAL AREAS. 

Step 4
Based on the observations in Step 3, choose one (or more) compositions to use as a starting point. Find ways to make the composition stronger, by overlapping, intersecting, combining, cutting, cropping, sewing stitching, glueing, etc.  Continue to refine the composition by rearranging, adding, and deleting elements.

Step 5
Explore with different materials (paint, collage, markers, fabric, metal, etc), continuing to refine the composition. Use color, texture, and value to tie everything together. 

NOTE: THIS IS NOT A 3-D PROJECT; KEEP THE WORK 2-D.It can have lots of texture,  alittle relief 1/8" and some depth, but the base board must be able to physically support all the materials you have incorporated. 

Research the words: Assemblage, Mixed-Media, Collage. below are other references.

Art-Historical Examples


Students Samples


Apr 8, 2017

MIXED MEDIA ASSEMBLAGE/COLLAGE PROJECT – DUE DATE- 4/17 + 4/18

Purpose
Create two mixed-media portraits or still life on Bristol board. Think about the theme of your persona or your subject's persona and style on how you will approach the project. This is not about traditional portraiture or just creating a typical still life, it's an interpretation as well, it's your original, unique vision, but it gives you the freedom to find creative solutions to challenge traditional perciptions. think abstract, deconstruction, mixed media, collaging, material, overlapping, LAYERING and weaving in your elements in creating a strong compositional solution. use your creative mind and create an affective integrated, cohesive series of TWO works of art that challenge the norm. Intergrate! don't treat your materials as seperates. they all must work together. INTEGRATION, NOT SEPARATION.

Two interpretive pieces either alternative portraiture or still life. Through the process, you will begin to explore additive technique in two-dimensional art. In particular, you will experiment with integrating collaging with traditional painting and drawing techniques. MUST BE VISUALLY PLEASING (good aesthetics please). Think and analyze your process, method of execution and explore creative solutions. Be experimental.

Attention will be given to the design principles we covered first semester. Namely: (framing, Scale, Hierarchy (points of interest/focal areas/emphasis), asymmetry, cropping techniques,  Textural look or feel, F/G relationship, balance, composition, value, contrast and color theory/relationships), color palette, asymmetry. All that we have studied thus far is crucial in creating a cohesive unified solution. How will everything tie in together to create a balanced composition. 

This project is treated as an abstraction and interpretive. not to be literal. All elements must work together to create a cohesive (unified), resolved, and finished work. Really think about your approach as in theme, style, be selective with materials and how to work them into your composition. Integrate the materials thinking of overlapping, layering, creating transparency in your finished piece. That can be done with different methods of layering mediums. You really need to analyze your piece and be visually aware of your AESTHETICS.

Due Dates (Critiques)
Mon/Wed Class: Monday, April 17th. 
Tues/Thurs Class: Tuesday, April 18th. 

Rubric
You will be assessed on your application of the design principles mentioned above, your creative solution, integration of materials, craftsmanship, composition, execution, sketches, and your creativity. 
Note: All projects turned in after the due-date will be reduced by one letter grade. 


Materials

  • Two Sheets of Bristol board 14in. x 12in. or bigger
  • Paint, markers, colored pencils, charcoal, watercolors, etc.
  • Fabric scraps, tissue paper, magazine cutouts, string, yarn, newspaper, etc.
  • Appropriate adhesive (white glue, rubber cement, gel medium)

Process

Step 1
In your sketchbook, create 3 different contours (silhouettes) that you will use as a reference for your collage. Themes can be a deconstructed portraiture, figurative, still life, abstract environment. BUT ALL ELEMENTS OF MEDIUMS AND MATERIALS MUST BE INTEGRATEAD, WEAVED INTO EACHOTHER, OVERLAPPING, INTERSECTING. MAKE IT A UNIFIED COMPOSITION. NOT COMPARMENTALISED. ELEMENTS MUST BE INTERGRATED NOT SEPERATED. MUST ALL WORK AS A WHOLE! THE SOME OF ALL PARTS. TOGETHER.

Begin by mapping out a theme/concept, think about materials, color palette, MAIN MATERIALS, your layout for both pieces, their relationships. what will crossover be? what is the common ground of your visuals, etc... Pay close attention to details, such as facial features or objects for still life. framing is important! and their relative size and position to one another. Be sure to map all these elements out correctly. Use cropping, scale and position on paper to create a dynamic composition.

Draw a silhouette of the head, then include neck and shoulders, add hair, include ears... Think about what you could add/remove to make it unique (pencil behind ear, sunglasses in hair, specific earring, etc). of course this also applies to a still life and all of its accents. whats the environment? look at Braque and Picasso JOSEPH CORNELL ASSEMBLAGES/collages. 

Process to consider when creating your mixed media composition. Think abstract. Think creative. deconstruct. think of creating focal areas and how your eye travels through the piece. WHAT ARE THE FOCAL AREAS? MAIN SUBJECT, SECONDARY TERTIARY FOCAL AREAS. Must have emphasis. things can't have equal importance on your canvas. there will always be a main subject. can't have everything same size, same value, same anyting. have to keep it DYNAMIC!

Step 2
Focus on other areas of your body- hands, feet, legs, and entire figure. Repeat the steps above, to create 5 more contours from these observational drawings. 

Step 3
Tape the composition to a wall, take a step back, and examine at your contours. Examine the positive/negative space, and composition, of each contour. What is successful. SQUINT.

Now, look at the compositions alongside each other. Pay attention to the different ways the compositions interact with each other. How do they inform (relate and influence) each other? What combinations of compositions are particularly successful? WHAT IS THE FOCAL AREAS? MAIN SUBJECT, SECONDARY TERTIARY FOCAL AREAS. 

Step 4
Based on the observations in Step 3, choose one (or more) compositions to use as a starting point. Find ways to make the composition stronger, by overlapping, intersecting, combining, cutting, cropping, etc.  Continue to refine the composition by rearranging, adding, and deleting elements.

Step 5
Explore with different materials (paint, collage, markers, fabric, metal, etc), continuing to refine the composition. Use color, texture, and value to tie everything together. 

NOTE: THIS IS NOT A 3-D PROJECT; KEEP THE WORK 2-D.It can have lots of texture, and some depth, but the bristol board must be able to physically support all the materials you have incorporated. 

Research the words: Assemblage, Mixed-Media, Collage. below are other references.

Art-Historical Examples


Students Samples


Sep 26, 2016

PROJECT 04 - Exercise producing a complete value grayscale - Mounted on WHite presentation board


From these 72 total swatches, which are 3 carefully measured gridded sheets, you will create a value scale representing TEN EVEN steps from black  to white. black and white with eight even incremental changes in-between.

Mount your swatches on presentation board for critique.


Demonstration video


Materials
-Mars Black and Titanium White acrylic
-9x12 inch bristol board x 2
-Pallet knife
-1" Brush (bright)
-2 cups (for water)
-Paint palette (aluminum foil)
-Paper Towels
Process/Schedule


First Class Period
  1. Lay out grid (to create your swatches) on bristol board. 2 sheets total if you succeed to create a wide range of well painted solid values. You will need a 3rd page.
  2. Grid will have a total of 24 rectangular swatches per page, each measuring 1"x2" with 1/2" space in-between each rectangle. 3 swatches across top of 9"x12" page and 8 swatches down the length of page. Total swatches per page = 24
  3. Lay separatley black and white paints out on palette, and mix paints starting from black (or white) and adding incremental amounts of the opposite color. Mix paint throughly with palette knife and then brush until well mixed and you have a solid tone and brush-in swatches to fill the entire page. Must paint with smooth strokes, no streaks and an opaque thick coat of paint for full coverage. may have to use a couple of coats of paint to achieve a smooth clean opaque gray tone.
  4. Each swatch should have consistent color, and be a unique value. Must paint 3-4 of same values. The more variety of values you paint e, the easier it will be to select 11 strong swatches to create the final value scale.
  5. The goal is to create as many distinct values as you can. Fill in each rectangle of your grid with a solid value. Paint slightly beyond the borders. you must still be able to see original guides as you will be carefully cutting out each swatch one by one with an exact blade.
  6. Be sure you have all 10 values represented from from black (straight from the tube) progressing to middle gray, and continuing through light grays toward bright white (also straight from the tube). 
  7. Clean your workspace and all your painting materials (brushes, palettes, etc)

Second Class Period
  1. Finish painting your two pages of value swatches. You may need more than 2 pages.
  2. Lay out your presentation board, using the guidelines provided below.
  3. With a metal ruler, and cutting board, carefully cut-out your painted swatches so they are exactly the same size (1" x 2"). Cut very carefully following the guides you measured out. Makes life easier and cuts will be much more exact. Make sure cuts are clean, by using a new x-acto blade. NO CUTTING DIRECTLY ON TABLES. Cutting boards must be used. These have to be as close to perfect as possible.

Homework

  1. Finish laying out your black presentation board, using the guidelines provided. 
  2. Bring your presentation board to class, along with your x-acto knife. 
  3. Finish cutting out your swatches, if not finished in class.
  4. You may first glue your swatches on a strip of 2"x11" as a safety net to make sure all swatches are glued right next to each other and follow a straight pattern vertically.


Final Class Period
  1. Select the best swatches from your entire page that represent 11 consistent steps in value. 
  2. Show your presentation board (with layout lines/grid) to instructor. Once it has been given the ok, proceed with mounting of swatches. DO NOT PROCEED UNTIL YOUR LAYOUT HAS BEEN APPROVED.
  3. Using rubber cement, carefully glue swatches to presentation board. There should be no gaps between swatches, and all swatches should be perfectly aligned. 
  4. Let rubber cement dry slightly, and remove any excess glue with the appropriate eraser. 
  5. Neatly Label (name and date) your work with hard pencil in lower right-hand corner. 
  6. Cut and tape tissue paper sheet to act as protector. 
The final 30 mins of class will be reserved for critique.

Rubric


You will be evaluated on the following:

1. Laying out your bristol board into an even grid (even measurements, straight lines).
2. Your ability to mix the paints evenly. 
3.  Painting swatches that are free of brush strokes, or excessive paint build up.
4.  Filling up your entire page with different/distinct values.
5. Choosing the best 10 swatches that represent even steps from black to white. 
6. Laying out your presentation board neatly (consistent measurements, and centered)
7. Cutting out your swatches, and mounting them to the presentation board. 
8. Removing excess glue and having all your swatches line up evenly. 

Layout Measurements

Below is the sample of the GRID for the Value scales. you need to me sure and cut the 2"x11" support strip to glue your swatches and also mount them on the 4"x13" thicker mounting board with a 1" boarder all around as we had done in class. if you have questions please communicate with your class mates during the break.


Mar 30, 2016

MIXED-MEDIA / COLLAGE PORTRAITS - Due 4/6 and 4/7 2016

Purpose

Create two mixed-media portraits on Bristol board. Think about the theme of your persona or your subject's persona and style in how you will approach the project. This is not about traditional portraiture, it's an interpretation as well, it's your original, unique vision, but it gives you the freedom to find creative solutions to the traditional portrait. think abstract, deconstruction, mixed media, collaging, material, overlapping and weaving in your elements in creating a strong compositional solution. You must find a way to integratae all the elements of your materials.

One self-portrait, and one portrait of a friend or family member. Through the process, you will begin to explore additive technique in two-dimensional art. In particular, you will experiment with integrating collaging with traditional painting and drawing techniques. MUST BE VISUALLY PLEASING (good aesthetics please). Think and analyze your process, method of execution and explore creative solutions. Be experimental.

Attention will be given to the design principles we covered first semester. Namely: (framing, Scale, Hierarchy, F/G relationship, balance, composition, value, contrast and color theory/relationships). All that we have studied thus far is crucial in creating a cohesive unified solution. How will everything tie in together to create a balanced composition. 

This project is treated as an abstraction and interpretive. not to be literal. All elements must work together to create a cohesive (unified), resolved, and finished work. Really think about your approach as in theme, style, be selective with materials and how to work them into your composition. Integrate the materials thinking of overlapping, layering, creating transparency in your finished piece. That can be done with different methods of layering mediums. You really need to analyze your piece and be visually aware of your AESTHETICS.

Due Dates (Critiques)

Mon/Wed Class: Wed, April 6th. 
Tues/Thurs Class: Thurs, April 7th. 

Rubric
You will be assessed on your application of the design principles mentioned above, your craftsmanship, and your creativity. 

Materials
  • Two Sheets of Bristol board 13in. x 10in. 
  • Paint, markers, colored pencils, charcoal, watercolors, etc.
  • Fabric scraps, tissue paper, magazine cutouts, string, yarn, newspaper, etc.
  • Appropriate adhesive (white glue, rubber cement, gel medium)

Process

Step 1
In your sketchbook, create 5 different contours (silhouettes) that you will use as a reference for your collage. 

Begin by drawing yourself with a mirror. Pay close attention to details, such as facial features, and their relative size and position to one another. Be sure to map all these elements out correctly. Use cropping and position on paper to create a dynamic composition.

Draw a silhouette of the head, then include neck and shoulders, add hair, include ears... Think about what you could add/remove to make it unique (pencil behind ear, sunglasses in hair, specific earring, etc)

Process to consider when creating your mixed media composition. Think abstract. Think creative. deconstruct. think of creating focal areas and how your eye travels through the piece.

Step 2
Focus on other areas of your body- hands, feet, legs, and entire figure. Repeat the steps above, to create 5 more contours from these observational drawings. 

Step 3
Tape the compositions to a wall, take a step back, and examine at your contours. Examine the positive/negative space, and composition, of each contour. Which are most successful? 

Now, look at the compositions alongside each other. Pay attention to the different ways the compositions interact with each other. Do they work as a pair? Are there similarities? Do they have elements that crossover? How do they inform (relate and influence) each other? What combinations of compositions are particularly successful? Of course they are not the same but they have similar styles that communicate to make them a pair.

You must Find ways to make the composition stronger, by overlapping, intersecting, combining, cutting, cropping, etc.  Continue to refine the composition by rearranging, adding, and deleting elements.

Step 4
Explore with different materials (paint, collage, markers, fabric, metal, etc), continuing to refine the composition. Use color, texture, and value to tie everything together. 

NOTE: THIS IS NOT A 3-D PROJECT; KEEP THE WORK 2-D.It can have lots of texture, and some depth, but the bristol board must be able to physically support all the materials you have incorporated. 

Research the terms: Assemblage, Mixed-Media, Collage. below are other references.

Art-Historical Examples


Students Samples